Data augmentation for object detection
This tutorial explains the basic functionality of SequentialProcessors for data augmentation in an object detection task.
You can find the complete script of this tutorial here
This script explains the basic functionality of SequentialProcessors for data augmentation in an object-detection task.
import os
import numpy as np
from tensorflow.keras.utils import get_file

from paz.abstract import SequentialProcessor, ProcessingSequence
from paz.models.detection.utils import create_prior_boxes
import paz.processors as pr
import paz.backend as P
Let's download a test image and put it inside our PAZ directory
IMAGE_URL = ('https://github.com/oarriaga/altamira-data/releases/download'
             '/v0.9/object_detection_augmentation.png')
image_filename = os.path.basename(IMAGE_URL)
image_fullpath = get_file(image_filename, IMAGE_URL, cache_subdir='paz/data')
Image augmentation and preprocessing part
We can also create sequential pipelines by inheriting SequentialProcessor
class AugmentImage(SequentialProcessor):
    def __init__(self):
        super(AugmentImage, self).__init__()
        self.add(pr.RandomContrast())
        self.add(pr.RandomBrightness())
        self.add(pr.RandomSaturation())
        self.add(pr.RandomHue())


class PreprocessImage(SequentialProcessor):
    def __init__(self, shape, mean=pr.BGR_IMAGENET_MEAN):
        super(PreprocessImage, self).__init__()
        self.add(pr.ResizeImage(shape))
        self.add(pr.CastImage(float))
        if mean is None:
            self.add(pr.NormalizeImage())
        else:
            self.add(pr.SubtractMeanImage(mean))
Let's see who it works:
preprocess_image, augment_image = PreprocessImage((300, 300)), AugmentImage()
print('Image pre-processing examples')
for _ in range(10):
    image = P.image.load_image(image_fullpath)
    image = preprocess_image(augment_image(image))
    P.image.show_image(image.astype('uint8'))
Box augmentation and preprocessing part
Let's first build our box labels: For a tutorial on how to build your box labels check here
H, W = P.image.load_image(image_fullpath).shape[:2]
class_names = ['background', 'human', 'horse']
box_data = np.array([[200 / W, 60 / H, 300 / W, 200 / H, 1],
                     [100 / W, 90 / H, 400 / W, 300 / H, 2]])
Data augmentation for boxes
class AugmentBoxes(SequentialProcessor):
    def __init__(self, mean=pr.BGR_IMAGENET_MEAN):
        super(AugmentBoxes, self).__init__()
        self.add(pr.ToImageBoxCoordinates())
        self.add(pr.Expand(mean=mean))
        self.add(pr.RandomSampleCrop())
        self.add(pr.RandomFlipBoxesLeftRight())
        self.add(pr.ToNormalizedBoxCoordinates())
To visualize our current box augmentation we build a quick pipeline for drawing our boxes
draw_boxes = SequentialProcessor([
    pr.ControlMap(pr.ToBoxes2D(class_names, False), [1], [1]),
    pr.ControlMap(pr.DenormalizeBoxes2D(), [0, 1], [1], {0: 0}),
    pr.DrawBoxes2D(class_names),
    pr.ShowImage()])
Let's test our box data augmentation pipeline!
augment_boxes = AugmentBoxes()
print('Box augmentation examples')
for _ in range(10):
    image = P.image.load_image(image_fullpath)
    image, boxes = augment_boxes(image, box_data.copy())
    draw_boxes(P.image.resize_image(image, (300, 300)), boxes)
Data preprocessing for boxes
There is also some box-preprocessing that is required. Mostly we must match our boxes to a set of default (prior) boxes. Then we must encode them and expand the class label to a one-hot vector.
class PreprocessBoxes(SequentialProcessor):
    def __init__(self, num_classes, prior_boxes, IOU, variances):
        super(PreprocessBoxes, self).__init__()
        self.add(pr.MatchBoxes(prior_boxes, IOU),)
        self.add(pr.EncodeBoxes(prior_boxes, variances))
        self.add(pr.BoxClassToOneHotVector(num_classes))
Putting everything together in a single processor:
Note that these is the same processor we have internally in PAZ: paz.pipelines.AugmentDetection.
class AugmentDetection(SequentialProcessor):
    def __init__(self, prior_boxes, split=pr.TRAIN, num_classes=21, size=300,
                 mean=pr.BGR_IMAGENET_MEAN, IOU=.5, variances=[.1, .2]):
        super(AugmentDetection, self).__init__()

        # image processors
        self.augment_image = AugmentImage()
        self.augment_image.add(pr.ConvertColorSpace(pr.RGB2BGR))
        self.preprocess_image = PreprocessImage((size, size), mean)

        # box processors
        self.augment_boxes = AugmentBoxes()
        args = (num_classes, prior_boxes, IOU, variances)
        self.preprocess_boxes = PreprocessBoxes(*args)

        # pipeline
        self.add(pr.UnpackDictionary(['image', 'boxes']))
        self.add(pr.ControlMap(pr.LoadImage(), [0], [0]))
        if split == pr.TRAIN:
            self.add(pr.ControlMap(self.augment_image, [0], [0]))
            self.add(pr.ControlMap(self.augment_boxes, [0, 1], [0, 1]))
        self.add(pr.ControlMap(self.preprocess_image, [0], [0]))
        self.add(pr.ControlMap(self.preprocess_boxes, [1], [1]))
        self.add(pr.SequenceWrapper(
            {0: {'image': [size, size, 3]}},
            {1: {'boxes': [len(prior_boxes), 4 + num_classes]}}))
Here we just made some small modifications to our original drawing pipeline
prior_boxes = create_prior_boxes()
draw_boxes.processors[0].processor.one_hot_encoded = True
draw_boxes.insert(0, pr.ControlMap(pr.DecodeBoxes(prior_boxes), [1], [1]))
draw_boxes.insert(2, pr.ControlMap(
    pr.FilterClassBoxes2D(class_names[1:]), [1], [1]))

def deprocess_image(image):
    image = (image + pr.BGR_IMAGENET_MEAN).astype('uint8')
    return P.image.convert_color_space(image, pr.BGR2RGB)
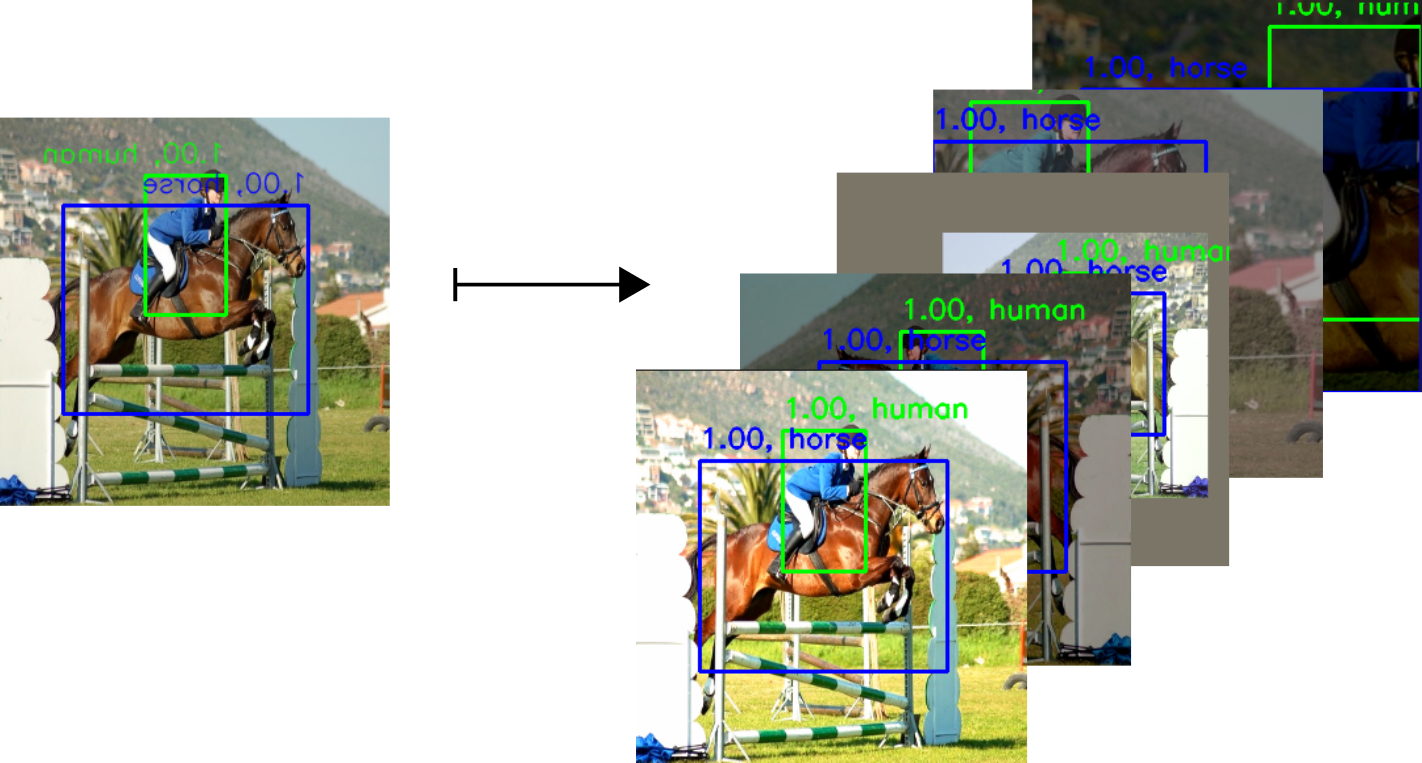
Finally we can apply our complete pipeline that preprocess and augments the images as well the bounding boxes!
augmentator = AugmentDetection(prior_boxes, num_classes=len(class_names))
print('Image and boxes augmentations')
for _ in range(10):
    sample = {'image': image_fullpath, 'boxes': box_data.copy()}
    data = augmentator(sample)
    image, boxes = data['inputs']['image'], data['labels']['boxes']
    image = deprocess_image(image)
    draw_boxes(image, boxes)
Note that we change the input and output format from lists to a dictionaries.
The input changed by adding the pr.UnpackDictionary processor, and the output changed by the pr.SequenceWrapper processor.
The pr.SequenceWrapper method allows us to easily connect the complete pipeline to a Sequence Generator.
Here we show you the final step such that you can wrap it in our custom generator and pass it directly to your model to do model.fit.
data = [{'image': image_fullpath, 'boxes': box_data}]
print('Image and boxes augmentations with generator')
batch_size = 1
sequence = ProcessingSequence(augmentator, batch_size, data)
for _ in range(10):
    batch = sequence.__getitem__(0)
    batch_images, batch_boxes = batch[0]['image'], batch[1]['boxes']
    image, boxes = batch_images[0], batch_boxes[0]
    image = deprocess_image(image)
    draw_boxes(image, boxes)
You should now be able to see transformations similar to these ones: